How to Transfer Files Between iPad and Computer
As we know, there are some limitations in transferring data from iOS device via iTunes. With some operational errors, it is likely to overwrite the original data on your device, and you'll face the risk of iPhone/iPad/iPod data loss.
If you are looking for another option to transfer files between iPad Pro/Air/Mini and computer without iTunes, iPhone Data Transfer is definitely the best choice. This professional iPhone/iPad/iPod data transfer software enable you transfer all kinds of data between iOS device and computer, including music, videos, photos, TV shows, Podcast, voice memos and more. It also can transfer data between iOS device or iTunes, fast transfer speed.It's easy to use, 100% Safe & Security, clear and simple interface for iPad iPhone iPod users, compatible with iPad Pro, iPad Air 2/1, iPad Mini 4/3/2/1, iPhone X, iPhone 8/8 Plus, iPhone 7/7 Plus, iPhone 6s/6s Plus/6/6 Plus, iPhone SE, iPhone 5s/5, iPhone 4s/4 and iPod.
Now, download the free trial version of iOS Data Transfer on the computer, and follow the step-to-step guide as follows to learn how to transfer data between iPad and computer.


How to Transfer Data from iPad to computer
The following data types are supported to export from iPad to computer,Support Text Files:
Text messages, Contacts, PDF, ePub, BooksSupport Media Files:
Pictures, Music, Voice memo, Movies, TV shows, Podcasts, iTunes U, Music video, Audio Books, Camera shot, Ringtones, Playlists, AlbumsStep 1. Connect iPad and Select iPad files
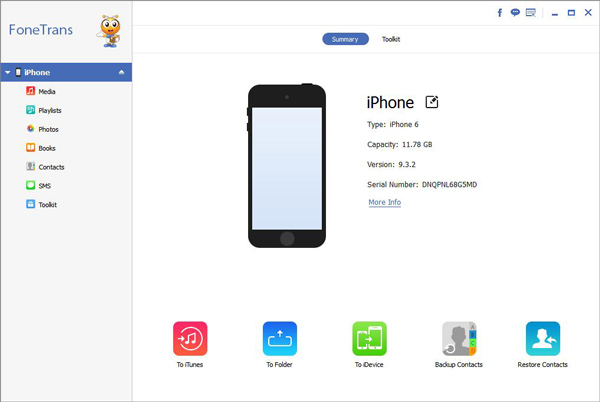
Launch iOS Data Transfer software after download and install it on the computer. Then connect iPad to computer via USB cable After connected successfully, the device will detected by the program automatically. From the main interface, the file types of iPad will be shown in the left list. Select the type of file from the library that you want to export from iPad to your computer.
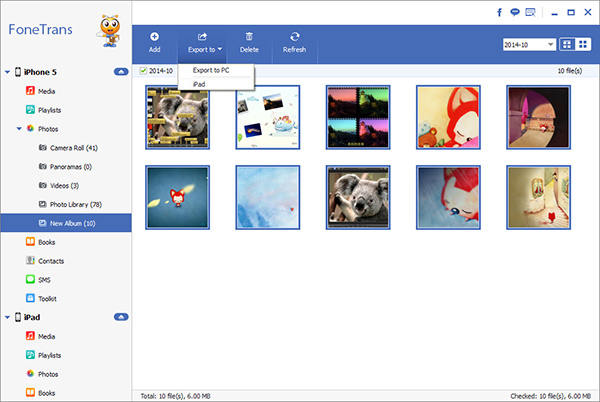
Step 2. Start to Transfer Data to Computer
When you see the window as below, tap "Export" -> "Export to PC". Select the target folder in the following dialog box, and then begin the process of exporting file(s) to PC.
How to Transfer Local Files from Computer to iPad
To transfer files from computer to iPad, iOS Data Recovery software supports the file types as follows:
The supported data for importing from computer to iPad are as the following:Support Text Files:
Contacts, PDF, ePub, Books.Support Media Files:
Photos, Music, Voice memo, Movies, TV shows, Ringtones, Playlists, Music video, Podcasts, Audio Books, Camera shot, iTunes U, Albums.Step 1. Choose target category list to store files
Launch iOS Data Transfer software to computer and connect iPad to it via USB cable. Then software will detect your iPad automatically and show you the main interface. You can select the file type from the left side of the interface, like Media, Playlists, photos, etc. Choose the data you want to import.
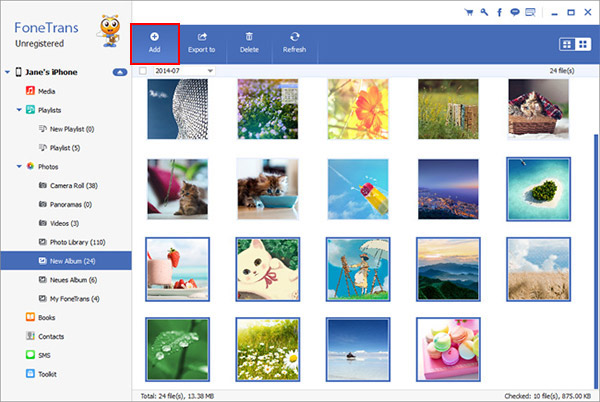
Step 2. Select local files
After you selected the file type, click "Add" button on the top of the window. Select the data you want to import and begin to transfer the files you choose to iPad. After the data transfer is completed, you can check and enjoy your data on iPad.
Note: iOS Data Transfer supports you to import the whole folder to iPad. Tap "Import file(s)" drop-down arrow to select Add Folder, and then begin the process to transfer your whole folder to iPad.

